Good morning! I’m standing here in my kitchen typing a few words before the kids and I start school. I’m looking at the seeds we planted in egg cartons last night. In 8 weeks, we will be planting them in the ground. It is ALMOST driving me crazy. I want to pick some fresh cucumbers and tomatoes like, RIGHT NOW. But alas, I must wait. I’m guessing they will taste even better because I’ve been waiting so long…

So a girl’s gotta make do with what she’s got. And what have I got? Some assorted flours, yeast, sugar, and water. Hence, while I await homegrown garden produce, I will eat and feed my family fresh bread. Took pics of the marbled rye bread I made yesterday. Still working on the marbling and getting the dark rye to proof like it ought to. But it tastes good, so that’s something.

I regularly make plain sandwich bread for us. I tell you, there’s something special about slicing it and making a grilled cheese. Or sopping up the liquid yellow from an egg with a slice of it. Or ripping off a piece right out of the oven and spreading some butter on it and popping it directly in my mouth.
With the rye bread, I love to make a classic ham sandwich with a slice of Swiss cheese, some thinly shredded lettuce, some horseradish sauce and pickled peppers (and the aforementioned tomatoes when we have them). Talk about heaven! My stomach growls just thinking about it.
So why is making your own bread such a great step to take when you are beginning to homestead? Here’s 7 reasons why I make our own bread:
1) It’s delicious. I mean, seriously. Fresh bread is ‘da bomb’. Aside from our gluten sensitive friends, who doesn’t enjoy a nice hot roll? Only bad thing is, those rolls don’t usually get made, save on special occasions. But with homemade bread, you have all the deliciousness of the roll with the practicality of sandwich bread.
2) It tastes better than store bought. This point deserved to be separated from the “it’s delicious” point above. I know that personally, I was so used to store bought sandwich bread that I had no idea how much better it COULD be. There are some really good sandwich breads on the market out there, and all kinds of variations, too. But I guarantee you, you take any one of those breads off the shelf, take it home, make your own homemade version… BOOM. No comparison. Homemade (except in some extreme kitchen mishap) will always taste better.
3) It saves money. So say you enjoy a good hearty version of sandwich bread from the store. I’m not talking store brand for $0.92 a pop. I’m talking that name brand, “they gotta put something special in this to make it taste so good” type bread. A typical loaf of that will be about 12 to 16 ounces. It will cost you $3 or more at the grocery store. Now I like to mix up my flours, some bread flour, some wheat, some rye. So I probably spend an easy $15 on flours. I bought a 25 lb. bag of bread flour for about $5, and the whole wheat cost about $5 for 8 lbs. at my local farm market. I bought the rye flours there as well for $5 dollars combined for approximately 5 lbs of flour. But those bags of flour will make me more than twenty 16 ounce loaves of bread! I also buy my yeast in bulk and store it in the freezer. So about $5 there for a pound of yeast, and I make all KINDS of baked goods with it, not just bread. Sugar and shortening are ingredients in the bread I make, but I always have them on hand. Plus, I only use a few tablespoons of each at a time, so the cost of these per loaf is marginal. The math is pretty easy: Approximately $20 of supplies will make you 20+ loaves of bread that is on par with the more expensive loaves in the grocery store. That works to about $1 per loaf. Not bad at all!
4) It’s not nearly as complicated as you might think. I used to be of the mind, like many of my grocery-store-shopping brethren, that if the store carries it, it must be too hard to do on your own. Boy was I wrong. Especially if you have a bread machine or stand mixer. I’ve even made bread by hand (“nature’s forks” as my kids like to call them) quite quickly. The biggest investment of time lies in the rise time. My sandwich bread requires two rises of about an hour and a half to two hours total. That’s why I like to start making mine early in the morning before the day really gets started. Then the bread is cool and ready to slice when I reach a mid morning lull in my day.
5) You know exactly what is in your bread. This keeps coming up in my posts because it’s one of the reasons I cook so much from scratch. I make it for my family when we need it, so I don’t require the preservatives that commercial bread makers rely on to keep their products fresh.
6) It makes for great bonding time with kids. Show me a kid who doesn’t like punching dough and I will show you a unicorn who moonlights as a stockbroker. Homeschooling my kids has helped me to teach them a lot of kitchen skills, and spending that extra time with them has really been wonderful. They love kneading dough, and I love to let them!
7) It boosts your confidence and enables you to tackle more homesteading firsts. I mentioned in reason 4 that sometimes we think things are way more complicated to do than they really are. The emotional and mental boost you get when you accomplish something you thought you would never be able to do increases your confidence. Next thing you’ll know, you’re making your own soap, or raising your own chickens, or learning any “new to you” homesteading skill! And that’s just awesome, so GO YOU!!!
I’m sure there are other reasons people make their own bread, but these are the ones that top my list.
There’s a few things you should know before delving into bread making.
First, fresh bread doesn’t stay fresh for long. Even in an airtight container, the softest sandwich bread only stays fresh for a few days. So plan ahead. My recipe makes two loaves. I keep one out to eat now, and throw the other in the freezer till we need it.
Second, making bread is addictive. Once you get one recipe under your belt, you will probably be rummaging through Pinterest to find a good pumpernickel recipe like I did! Or learning (like I still am) how to make a good marbled rye. But all your projects will be edible, so it’s all good!
Third, stale bread should NEVER be thrown away. French toast, or as we called it in Louisiana “pain perdu” (which means “lost bread”), tastes great when made with homemade bread. Toasting bread that’s a little stale still makes a great sandwich. And… croutons. Yes, you can stop buying croutons for your salad now because you can make them at home with stale bread. Just cube up your bread, set it out to dry thoroughly. Melt a couple tablespoons of butter and toss that along with your choice of seasonings with the bread. Then bake till crunchy in a 350 degree oven. They taste amazing; I just recently made some with some old rye and made them Italian seasoned. There are no words.
Fourth, baking good bread is a skill that doesn’t always come easily. Even if your first 10 loaves turn out perfect, there’s always a chance that the 11th one won’t rise just the way it should’ve. It’s all good! Don’t give up! Even non-perfect bread tastes good!
So there we have it, folks. 7 reasons to make your own bread…I hope at least one of them resonates with you. 🙂 Life is busy, and not all of us have the time to make all the bread our families will eat each week. However, giving it a shot just once can, at the very least, let you know what’s possible in your own circumstances. Maybe you can do a loaf once a month for Sunday dinner. Maybe a batch of rolls when company comes. Maybe you find that you CAN make your family’s bread each week, even though you never thought before that you could! Any way it plays out, you still took one step. And that’s a lot, especially in an increasingly “consuming” society.
How about a recipe AND an awesome resource to get you started? First, the resource. I checked this book out of the library years ago and found some golden recipes that I still use today. Take a look! It’s the kind of recipes that aren’t difficult to make, but when you finish, they look like artisan quality stuff! Plus, it’s not just sandwich bread. It’s desserts and variations of classics, full of cheese and seasonings! My favorites are the Chewy Chocolate Sticks (I omit the raisins and double the chocolate chips because I have a strict policy against brown dots in my sweets that are not chocolate, but that’s just me!) and the Franchise Style Homemade Doughnuts. Here’s a link to the book:
The Bread Bible by Rose Levy Beranbaum
Now, on to the recipe. I use this one weekly and there’s a lot of room for experimentation if you’re feeling adventurous. Try using different flours (although using coarser flours like whole wheat will affect the overall texture of the bread), or braiding the dough instead of using a loaf pan. You could try a pretty score on top just before you pop them in the oven. Any way you choose to make it, here’s the “bones” you will need to start with. It is a variation of the Gold Medal recipe, just so ya know. 🙂
Sandwich Bread:
1) Start with 3 cups flour (I usually use bread flour, but have used 1 1/2 c. Whole wheat flour and 1 1/2 c. Bread flour before with good results!), 4 1/2 tsp. Baking yeast, 3 Tbsp. Sugar (Again feel free to use something other than the white sugar I use while remembering that the different makeup of raw sugar or brown sugar will affect the overall texture of the bread. It will be more dense and less fluffy.), 1 Tbsp. Salt. Mix these together in a large mixer with a yeast hook attachment OR just use your hands. I’ve made this bread many times with my hands and it’s not hard AT ALL.

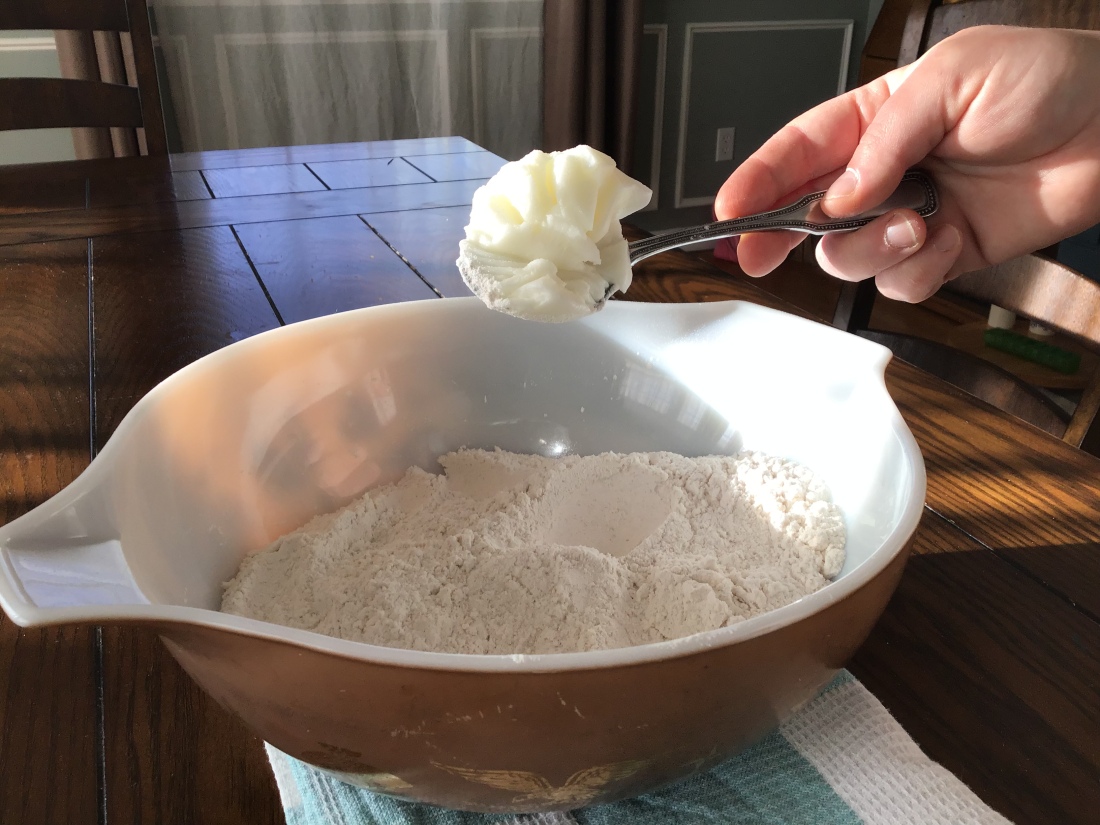
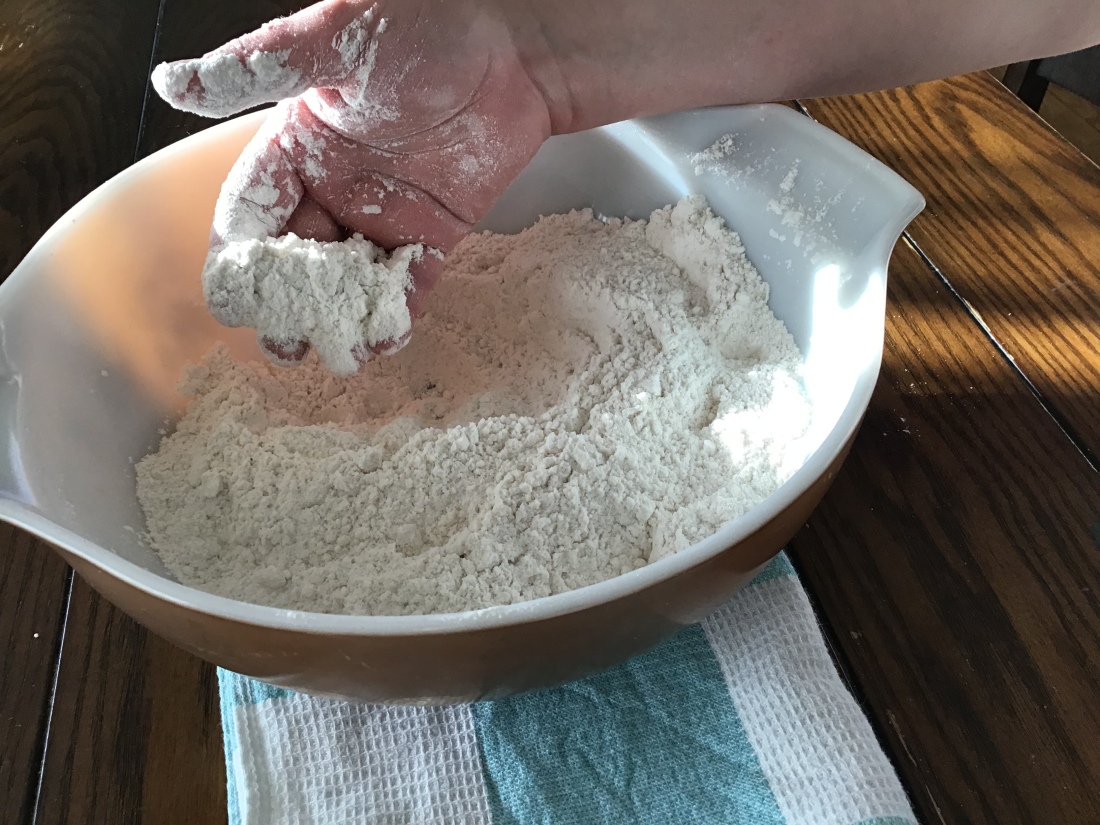
2) Next, work in a nice spoonful of shortening. See the picture below. I never measure the shortening, I just eyeball it. You want about 2 Tbsp. Mix it into the flour mixture till the mixture looks “crumby” or “sandy”. When you get there, you’ll know what I’m talking about. Kinda like this:
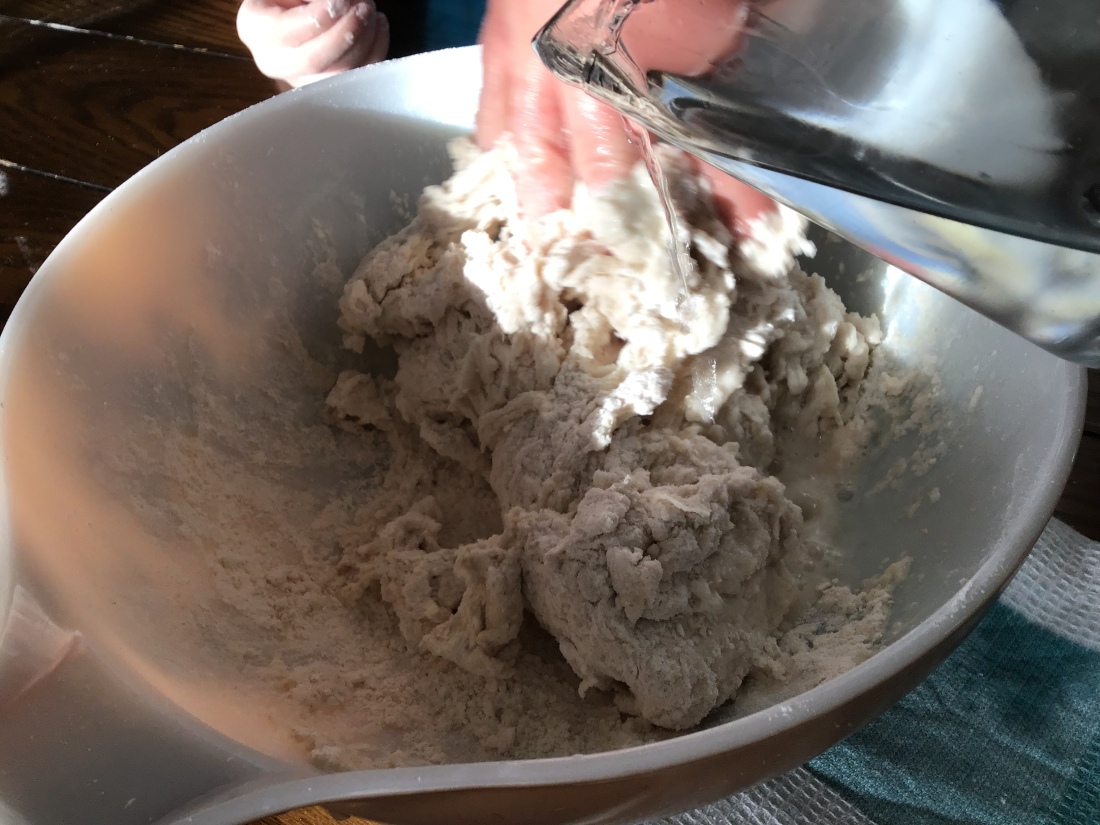
3) Now, mix in 2 cups of water, heated to about 110 degrees Fahrenheit. I never measure the temp. I just stick a clean finger in it. If it’s not tepid, but not so warm I can’t keep my finger in it comfortably, it’s the perfect temperature. The dough you will now have will be a mushy mucky mess. That’s ok. Now it’s time to add more flour. You should have 3 c. Flour on hand to use. But you may not mix all of it in. You basically want to add just enough flour to your mushy mess to make the dough form a good ball that you can knead. Usually that’s only 2 or 2 1/2 cups of flour.
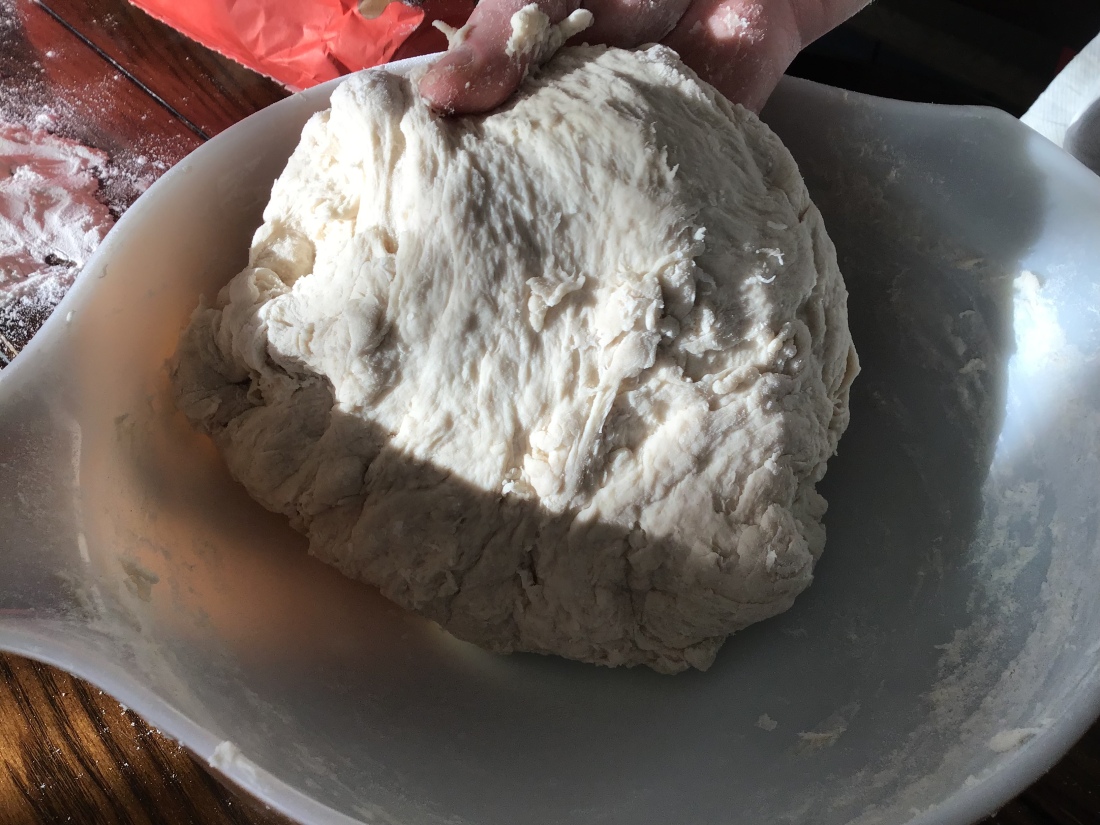
4) At this point, it’s time to bring in the kids if you have any on hand, because the dough needs to be kneaded for at least 5 minutes, but it could take up to 10. If you use a mixer with a dough attachment, you can just turn it on medium speed now, and beat away. If you’re doing it by hand, you will want to turn the dough out on your lightly floured counter and knead (punch dough down, fold it over itself, then punch down and flatten again, repeat) until the dough is a smooth pretty ball. When you pull it apart it stretches instead of quickly breaking.


5) Now it’s time to rest. Just put the dough in a large greased bowl, throw a towel over it, and place the bowl in a nice warm place to rise. Set the timer for 45 minutes and take a nap.

6) When you wake up, check the dough to see if it has doubled in size. It may take longer than 45 minutes. Yay! Longer nap! But, if it has doubled in 45 minutes, you want to gently punch (what an oxymoron, but that’s what EVERY. BREAD. RECIPE. TELLS. YOU. TO. DO.) it down, and roll the dough back onto your counter.

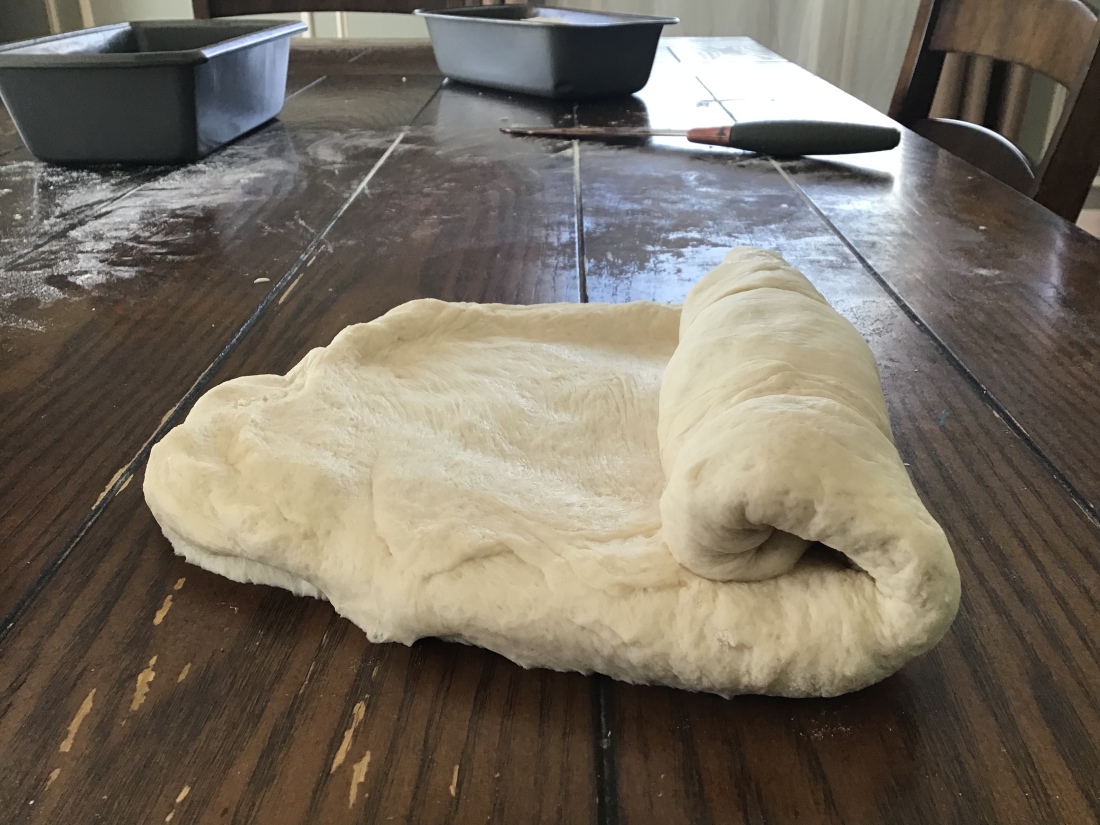
7) Now is a good time to set your oven to 375 degrees F. Go back to your dough, split it in half, and form into loaves. This is really easy to do. You roll out each half into a rectangle. Doesn’t have to a big rectangle. In fact, a good rule of thumb is to make the shorter sides of the rectangle a little shorter than your loaf pan, which I believe is 9 inches. Then, starting a shorter end, roll the dough up like a jelly roll. When you get to the end, pinch the “seam” between the loaf and the end of the roll closed. Then pinch the sides of the roll closed. This does not have to be perfect because the bread will rise in the pan, and the finished product will not be a roll.

8) Place the loaf seam side DOWN in a greased bread pan. Nope, it doesn’t matter if your bread pan is “non stick”. Grease it anyway. Use shortening, olive oil, butter, whatever. But the last thing you want is to have to pull your bread out of the pan that you worked so hard to make only to find half of it stayed in the pan. Speaking from experience here. Repeat this same process with second loaf.


9) At this point you can brush the tops with egg wash to make the tops come out nice and shiny and brown. But you can also just throw a towel over them and let them rise in their pans for another half hour.
10) When the loaves have risen above the pan and filled it out nicely, pop them in the oven for 25 to 30 minutes. They should be nice and brown on top.

11) Cool them 10 minutes in the pan. Then turn the loaves out and cool completely on a cooling rack. Once they have completely cooled, you can slice them and place them in an airtight container, or keep the loaves whole and slice as you need. But you still need to keep it in an airtight container.
And that’s that! You know what, you should treat yourself now for all your hard work. Take a slice off of one of those puppies, spread some melty butter on it, and enjoy!
Thanks so much for visiting me again. I hope my posts inspire you to be a little more adventurous and to enjoy the simple things a little more, one step at a time! Take care, till next week when we “see” each other again!
Meg
*Disclosure: As an Amazon affiliate, I may receive a percentage of any purchase you make using links on my blog.

My stomach is growling reading about bread. I make dinner rolls and biscuits pretty regularly but always have trouble with making a loaf of bread. Maybe it’s a temp thing. The outside is done but the inside is a little under done. I’ll try this recipe and see how it goes. Your marble rye is beautiful!
LikeLike
Thanks for the compliment! If your bread is under-done, you might just want to keep it in the oven for a full 30 minutes. I always get a little antsy when the bread starts browning; I want to take it out before it burns! But I learned the outside color doesn’t always mean the inside’s done. Hope that helps!
LikeLike